
Optimised Procedures for Running Protein Samples
Application Note for Multisizer 4 Coulter Counter
IntroductionBeckman Coulter’s Multisizer 4 provides analysts with an easy-to-use, technologically-advanced system that can solve most particle sizing and counting challenges. Implementing the Coulter Principle with Smart Technology, the Multisizer 4 ensures the repeatability and uniformity of sample analysis conditions and therefore produces reliable results.
Although the following procedures were developed to address common issues encountered when analysing subvisible particles in protein formulations, the general guidelines can also be used for applications requiring small aperture tubes. Specifically, the cleaning procedures are valuable when characterising very small particles at low concentrations.
Material Requirements- Nalgene 5 mL Sample Vial (Fisher P/N 6250-0005)
- Stage Adapter (Beckman Coulter P/N A93166)
- Neutral Detergent Cleaner (Beckman Coulter P/N 8304096)
- Recommended Apertures: 30 µm, 50 µm, 70 µm, or 100 µm
- Internal Aperture Brush (Beckman Coulter P/N 54060001)
- External Aperture Brush (Beckman Coulter P/N 5406011)
- Accuvette ST (Beckman Coulter P/N A35473)
- 200 mL Enhanced Performance Beaker (Beckman Coulter P/N A35596)
- Isopropyl Alcohol – optional
- Additional Electrolyte Jar for 2% Soap Solution (Beckman Coulter P/N A36403) – optional
- Syringe filters
– Pall Acrodisc 25 mm PES Filters
– 0.45 µm pore (Beckman Coulter P/N 4614)
– 0.20 µm pore (Beckman Coulter P/N 4612)
NOTE: All buffers must be highly filtered to ensure accurate counting. We recommend continuous filtration with PES filters. Filtering buffers through the 0.45 µm filter, followed by the 0.2 µm filter connected in serial, is recommended. For ease of use, continuous filtration with PES filters is recommended.
INSTRUMENT START-UPIf the Multisizer 4 has been idle for more than 72 hours, repeated flushing with a 2% solution of neutral detergent is recommended. Alternatively, IPA can be used. This procedure removes any salt crystals, dirt or other contaminants that may have grown in the system while liquid sat motionless.
Start-up Procedure- 1. In the Multisizer 4 software, select “Run” in the menu bar, then select “Drain System”. Follow the on-screen instructions.
- 2. Once the system is drained, fill the electrolyte bottle with cleaning solution (2% soap or IPA).
- 3. Replace the electrolyte bottle in the Multisizer 4.
- 4. Select “Run” in the menu bar, then select “Fill System”.
- 5. Once the system is filled, repeat steps 1-4. Repeat the entire cycle three times.
- 6. After the final drain, fill the system with highly-filtered Isoton II (which should come from a continuous filtration system).
NOTE: The internal waste tank may become full during this process. If so, select “Empty Waste Tank” when prompted. This will pump the contents of the internal waste tank to the external waste jar.
Running SamplesGiven your knowledge of the sample system you are running and the guidelines presented in Table 1, select an aperture with which to work. Select “Run” from the menu bar, then select “Change Aperture Tube Wizard”. Follow the on-screen instructions.
Table 1: Guidelines for buffer strength and lowest recommended size range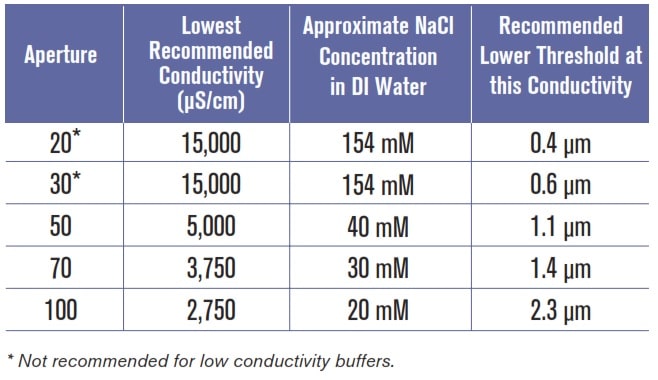
Stage 1. Install the stage adapter. Refer to Figure 1 showing the Sample Stage as it will appear at the onset of experiments.
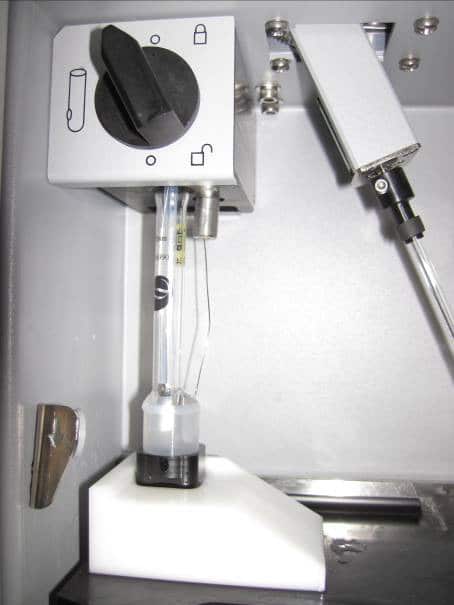
Figure 1: The minicuvette adaptor allows users to operate the Multisizer 4 with as little as 4 mL of material.
Stage 2. Fill a 5 mL Nalgene cup with the buffer of interest. NOTE: For most accurate results, this buffer should match the buffer in the electrolyte jar.
Stage 3. Test the noise level in the buffer of interest. From the menu bar, select “Run” / “Troubleshooting” / “Check the noise level”. A pop-up box will appear. Select “Measure Noise Level” as shown in Figures 2A and 2B.
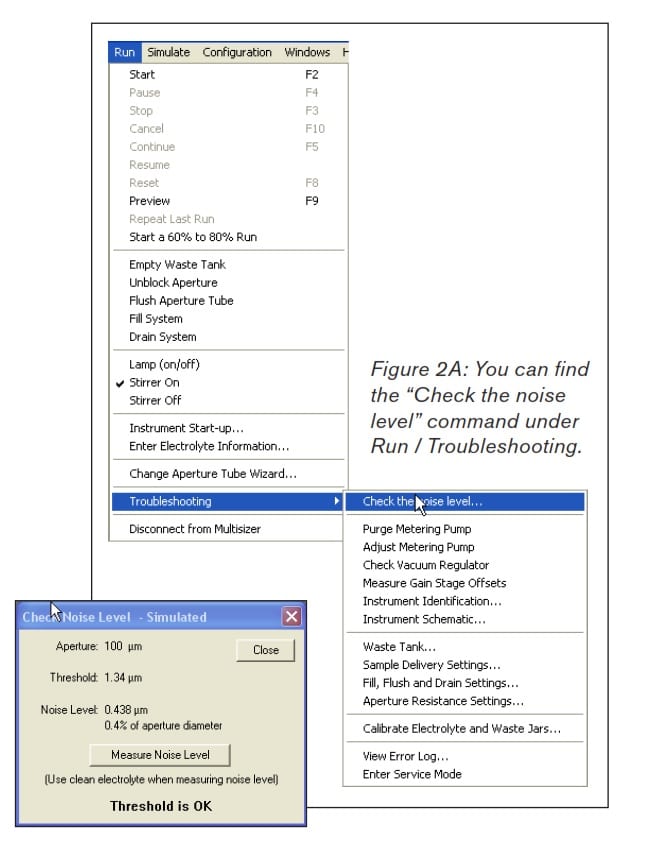
Figure 2B: After selecting “Measure Noise Level,” the results should match or exceed the recommendations in Table 1.
Stage 4. Verify that the SOM settings are configured as indicated. Select “Edit SOM” to bring up the SOM menu. See Figures 3A and 3B.
A) UNDER “CONTROL MODE” TAB Verify that the control mode is set to volumetric. The maximum recommended analytic volume is 100 µl per run. Select “Apply”.
B) UNDER “RUN SETTINGS” TAB Ensure “Include Pulse Data” is checked. Number of Runs should read 3. Select “Flush Aperture tube after each run” and “Flush Aperture tube before first run”. Select “Apply”.
C) UNDER “STIRRER” TAB Verify the “Accuvette ST” is selected under “Sample Beaker”. Click “Apply”.
D) UNDER “CURRENT AND GAIN” TAB Verify the sizing threshold is at or below the lowest recommended size in Table 1.
E) UNDER “PULSE TO SIZE SETTINGS” TAB Verify setting is at or above the lowest recommended size listed in Table 1. Select “SOP” in the menu bar, then “Edit the SOM.” Select “Pulse to Size Settings” Tab. Check the value in the box next to the word “from”. Select “Apply”.
F) UNDER “CONCENTRATION” TAB Enter the dilution information if applicable.
G) UNDER “BLOCKAGE” TAB Select “Blockage Detection”. Select “Defaults” then “OK”. Select “Blockage Monitor…”, “Defaults” and then select “OK”.
Stage 5. Once the SOM protocol is complete, perform a buffer only sample by selecting “Start”. A buffer only sample should read less than 100 total particles in a 100 µl sample. To verify this, ensure you have selected “Number” under the graph drop down menu in the data window. Then, check the particle count in the statistics box. See Figure 4 for reference.
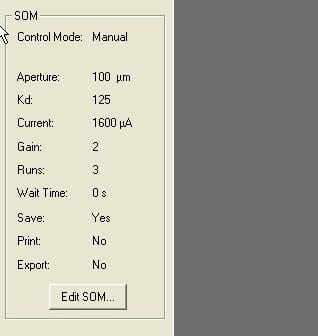
Figure 3A: Select “Edit SOM” to open SOM menu.
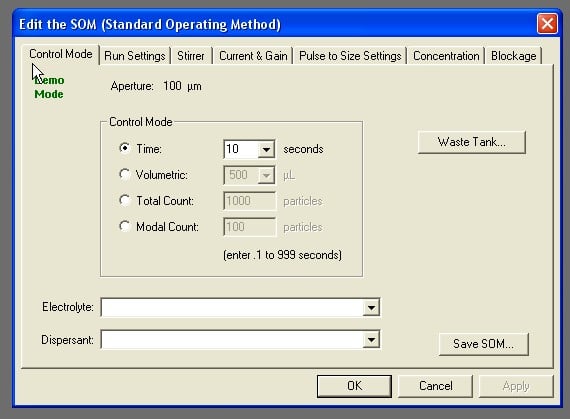
Figure 3B: Use the tabs in the SOM menu to navigate. Ensure all the settings match those described in the text.
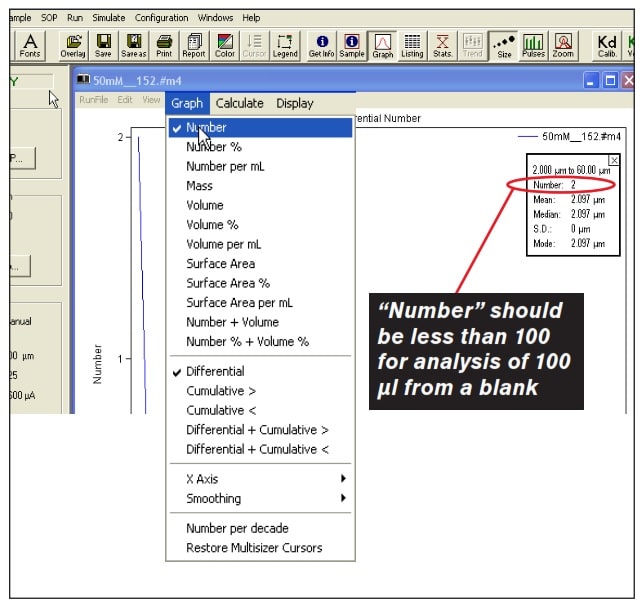
Figure 2B: After selecting “Measure Noise Level,” the results should match or exceed the recommendations in Table 1.
Stage 6. Once a buffer only is complete, the instrument is ready to run samples. Remove the blank, load your sample, and select “Start”.
Stage 7.If a block occurs, follow step 8 “After run is complete”.
Stage 8.After run is complete, lower the stage. Fill a beaker (or Accuvette) with a 2% soap solution and submerge the aperture (can hold beaker in hand and leave door open). Select “Unblock” in the Multisizer 4 software. This will repeatedly flush soap solution through the aperture and remove any proteins. This is necessary as proteins tend to adhere to all surfaces. After the unblock procedure is complete, load the blank sample, close the door, and select “Preview”. The concentration meter should be steady at 0.0%. It may take a few seconds before it stabilises. This is the time necessary to flush away any remaining sample. See Figures 5A and 5B.
Stage 9. Repeat steps 6-8 until all samples are completed.
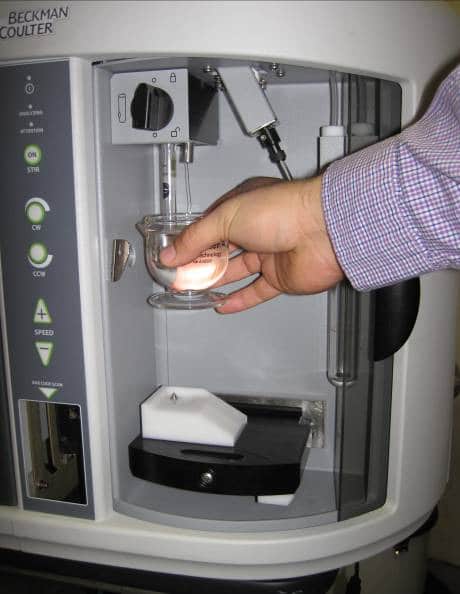
Figure 5A: With the door open, hold a beaker filler with 2% soap solution around the aperture.
INSTRUMENT SHUT DOWN FOR OVERNIGHT
Stage 1. Fill a 200 mL beaker with 2% soap solution. Flip the stage over so it can accommodate the beaker. Place the beaker on the stage, but do not raise it.
Stage 2. In the Multisizer 4 software, select “SOP” in the menu bar. Select “Edit the SOM”. Under Sample Beaker, select “200 mL ST”. Make sure the “Use Stirrer” box is selected and the stirrer speed is 20. Select “Apply”. The stirrer should move into position on the Multisizer 4.
Stage 3. Raise the stage with the 200 mL beaker. The stirrer should begin moving once submerged. The system can be left overnight with this set-up. The next day, you should only need to follow the “RUNNING SAMPLES” section of this procedure.
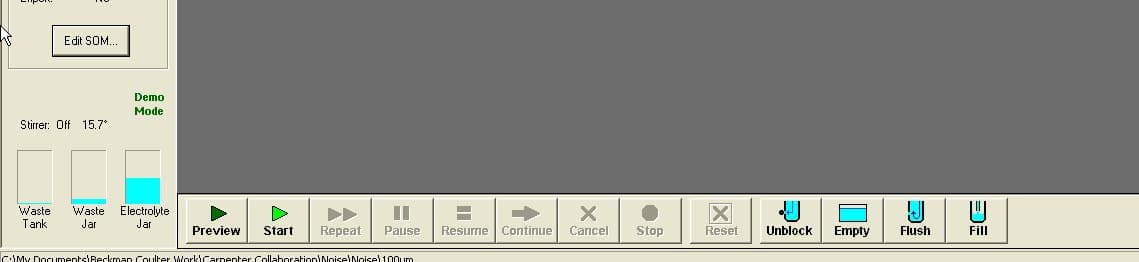
Figure 5B: While holding the beaker with soap solution, select “Unblock” button in software.
More information
More information on the Beckman Coulter Multisizer 4e here.